Get more attendees for your Webinar with the CalendarApp
The CalendarApp offers you a huge range of different use cases serving your business the best. Therefore, we are more than happy to also make sure you can use the CalendarApp for your next online webinar.
Social media is a fantastic way to generate leads for your business. In doing so you can invite your leads to attend your upcoming webinar very easily driving the conversation forward.
When it comes to webinars you can generally differentiate between two types of webinars: webinars with a limited number of attendees and webinars with an unlimited number of attendees.
If you don’t have a CalendarApp account yet sign up for free!
Limiting your audience is great especially if you want to make your webinar more exclusive. You simultaneously increase the level of FOMO in your leads making sure they sign up as soon as possible. They don’t want to have the fear of missing out.
Obviously, you can also set your webinar to an unlimited number of attendees. The CalendarApp does not restrict you in any shape or form. Scheduling webinars for 2 or 10.000 people does not make any difference.
To create your webinar event follow the following instructions.
Table of Contents
1. Create new event Webinar Event from the CalendarApp Templates
Click on the CalendarApp Webinar template to create a new Event for your Webinar.

In case you have connected multipe Google Accounts or Manychat pages select your desired account and page.
If you want to learn more about how to connect additional Google Accounts and Manychat pages so you can use the CalendarApp for your agency read our related blog article.
Edit the event by clicking on the pencil icon.
In the opened sidebar change the event name to something meaningful, for instance CalendarApp Q&A Webinar.

2. Edit your webinar settings
To edit the template click on the pencil icon. The opened dialog lets you
a) Add or create your Google Calendar
b) set the number of attendees
c) adjust general calendar settings
d) add scheduling settings and
e) set opening hours
Due to the fact that you used a CalendarApp template everything is also set up. So actually, you are already set to get attendees sign up for your webinar. However, in case you want to make adjustments follow the instructions below

a) Edit, add or create a Google Calendar
By default your primary calendar is selected. If you want to use a different calendar that stores the appointments:
- Click on the bin icon to remove the calendar from the list
- Choose an already existing calendar from the dropdown. Alternatively, type the name of your calendar and select create calendar. After a few seconds your new calendar is created.
- Click the + icon to add the calendar to the list
b) Set number of attendees
By default the number of attendees is set to unlimited. To change this:
- click on the pencil icon
- input your number in the according field
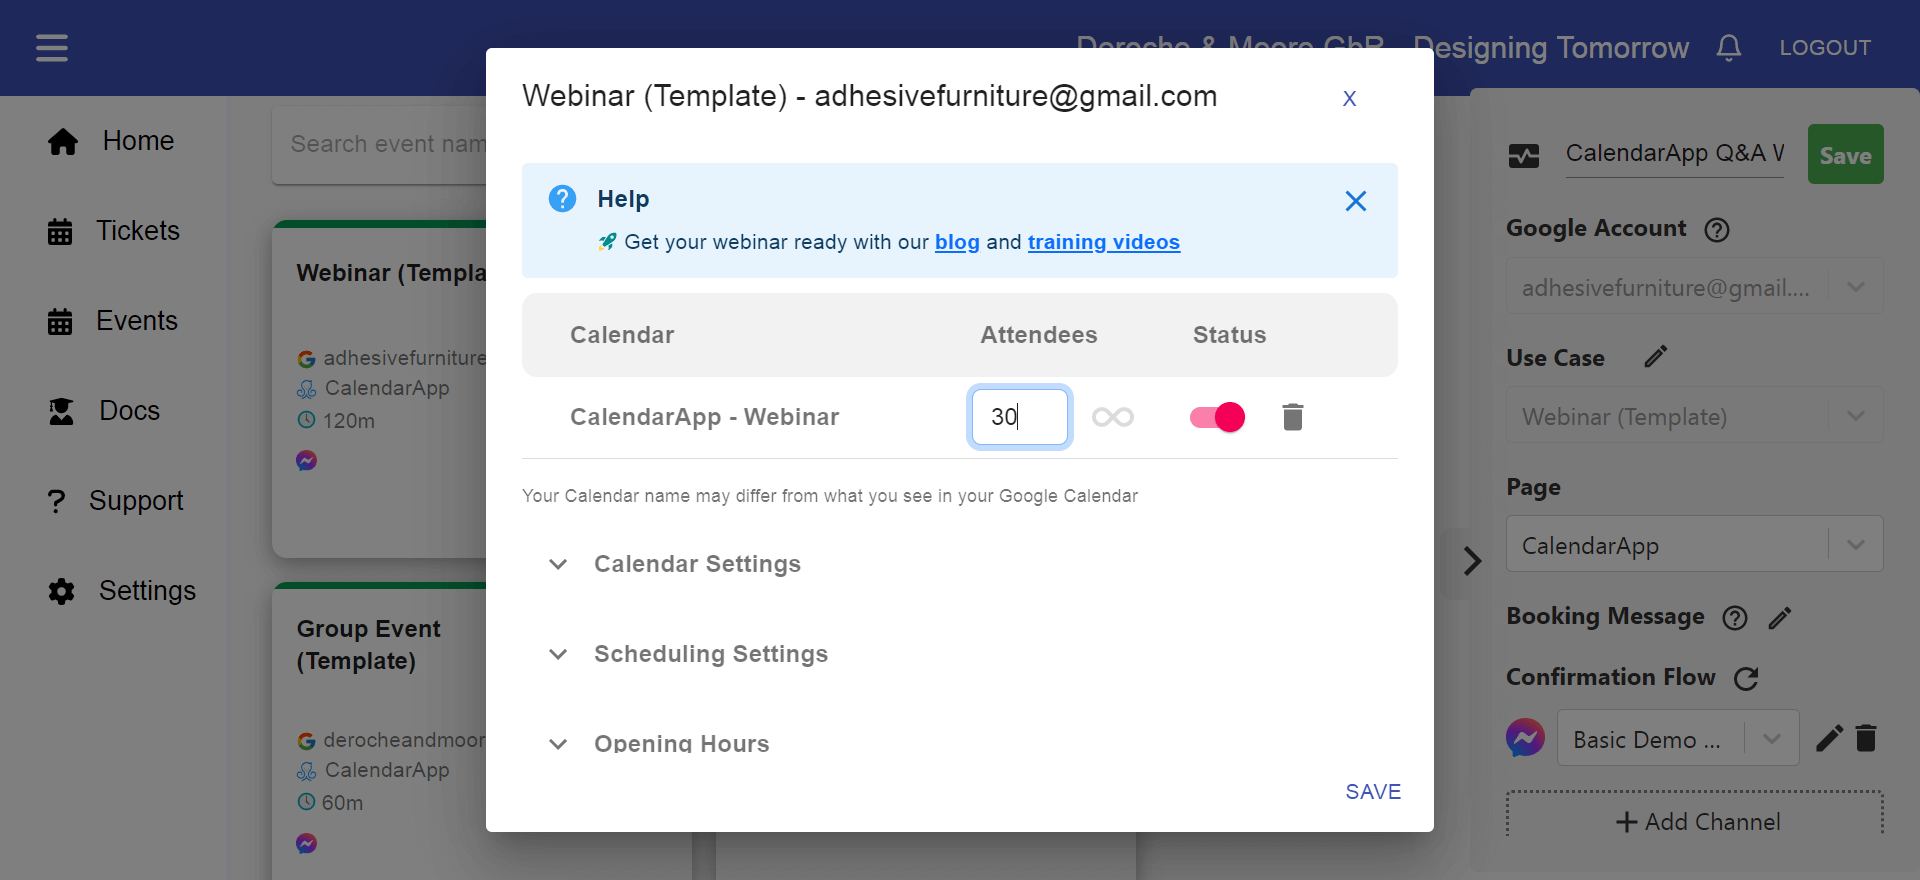
If you allow as many people as possible to attend your webinar select the infinity symbol.
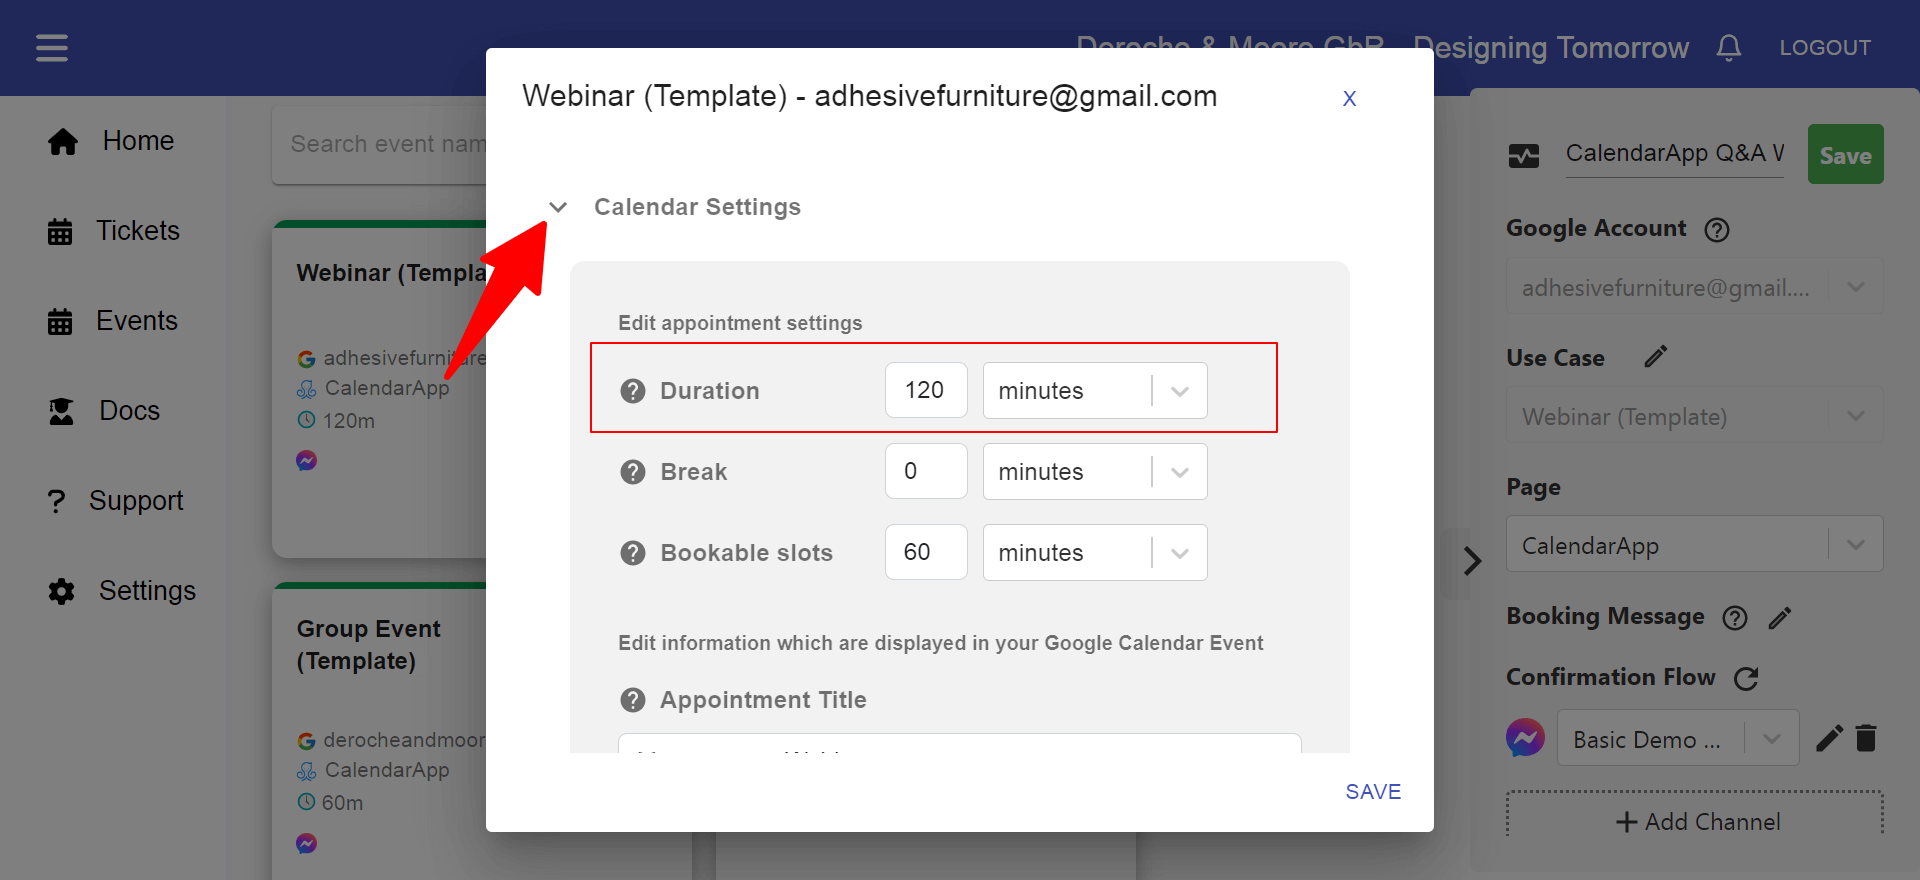
c) Calendar Settings
Next, you can set some additional calendar settings. We are focusing on the duration of your webinar, bookable time slots, the appointment’s title and the all day event. The remaining settings are explained in further details in our article How to set your calendar settings.
Duration
Quite self explanatory, here you set the length of your webinar in minutes or hours. For instance 45 minutes.
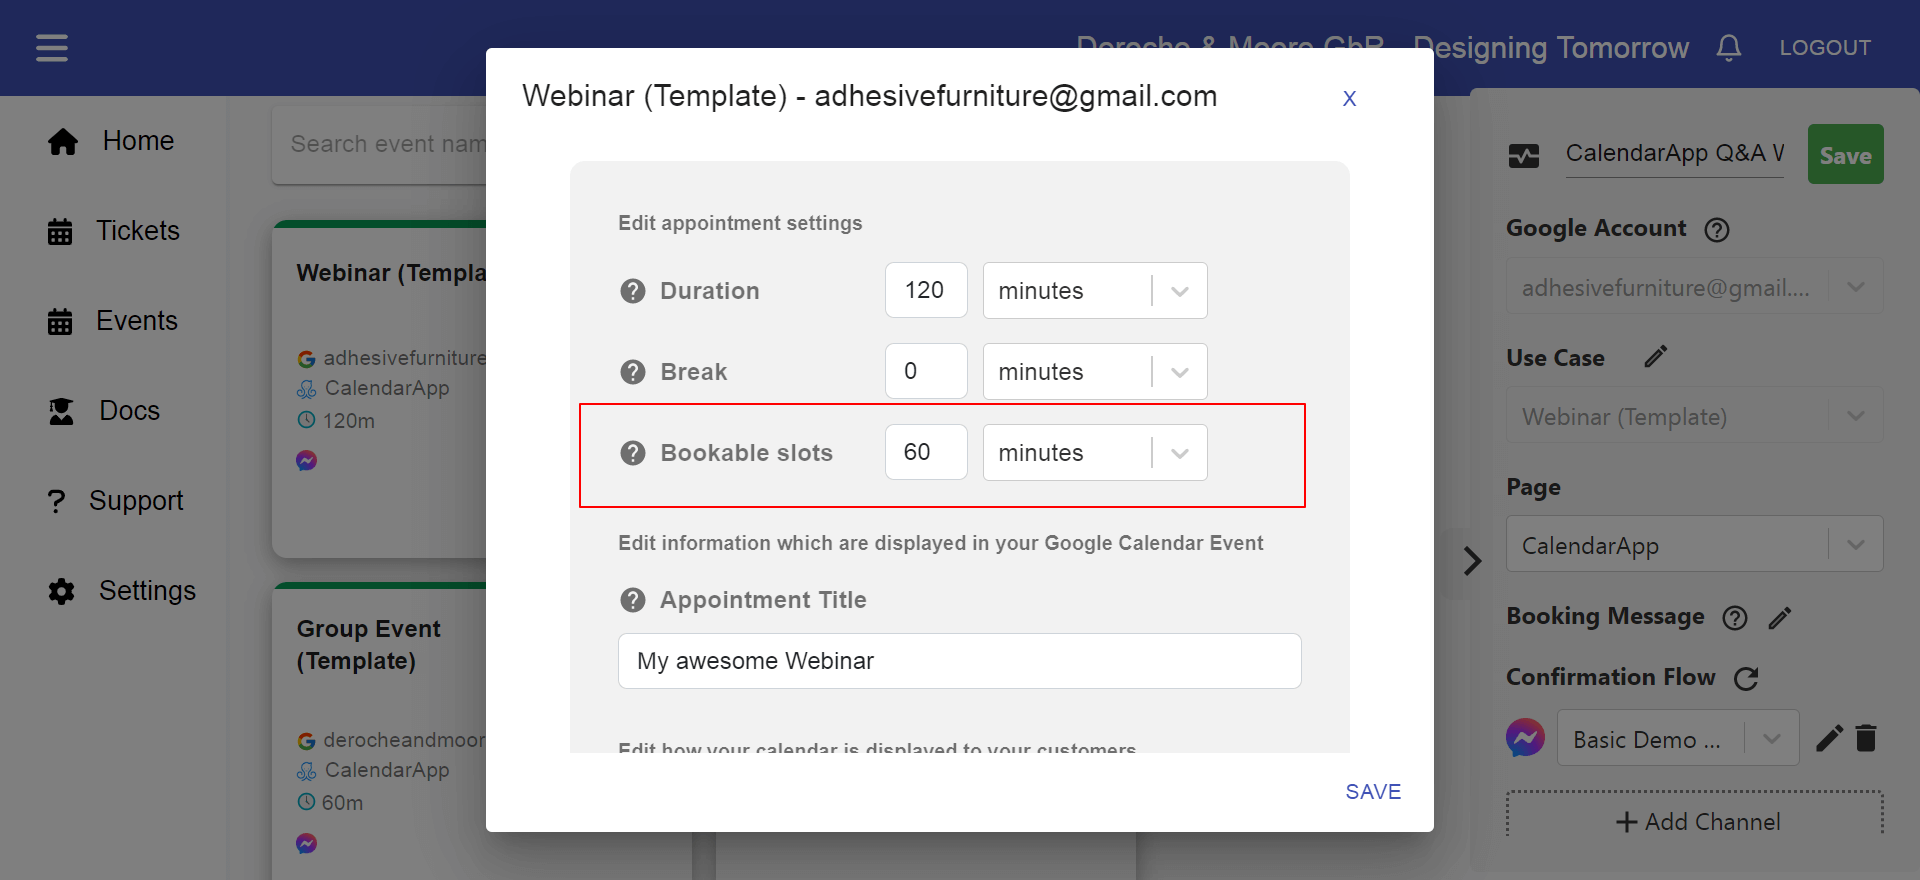
Bookable Time Slots (Attendees can register every … minutes)
Next, you set the available time slots that your attendees can register for your webinar. So, setting bookable time slots to 1 hour will result in buttons like 4 PM, 5PM,6PM,..
In case of a webinar it makes sense to have your number of bookable time slots being greater than your duration.
If you offer 2 one hour long webinars per day, for instance, one at 1PM and the other one at 7PM set your bookable time slots at 6 hours.
On a side note: you can also create an event in your Google Calendar between 2PM and 7PM to block those times. It has the same result. Bookable time slots, however, require less set up in your Google Calendar.
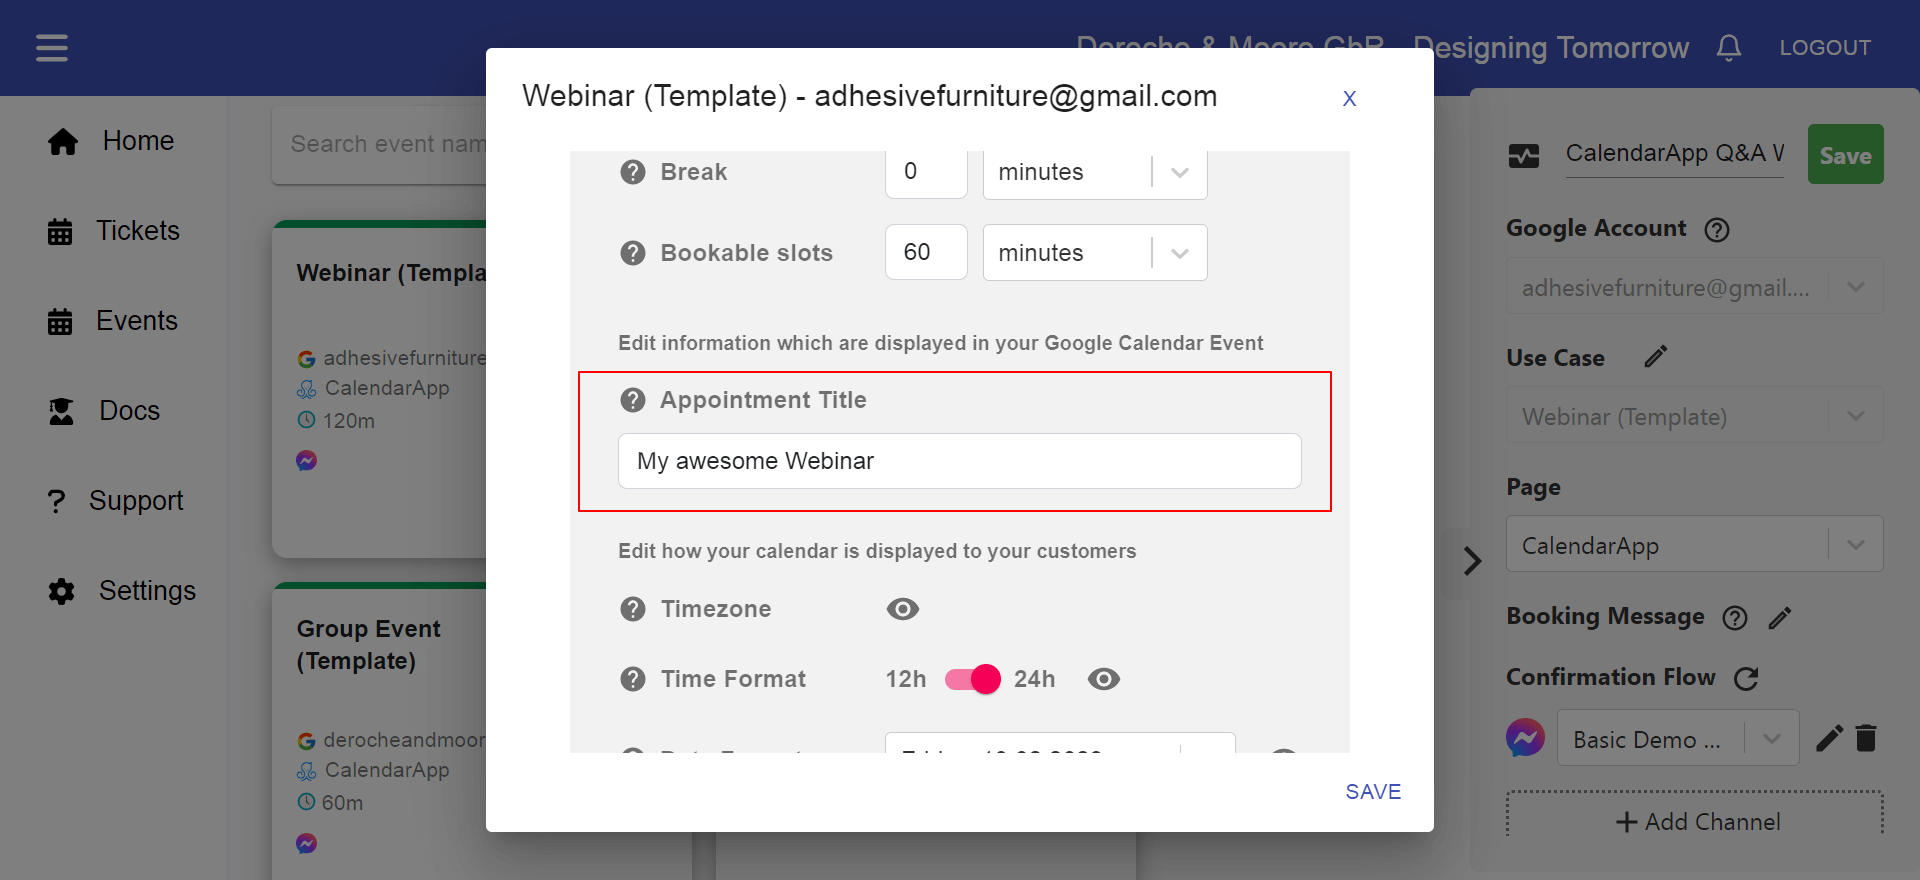
Appointment’s Title
The appointment title you choose will show up in your Google Calendar and in your upcoming events list. Using a great descriptive title such as “CalendarApp Q&A Restaurant Owners” will help you filter your attendees later.
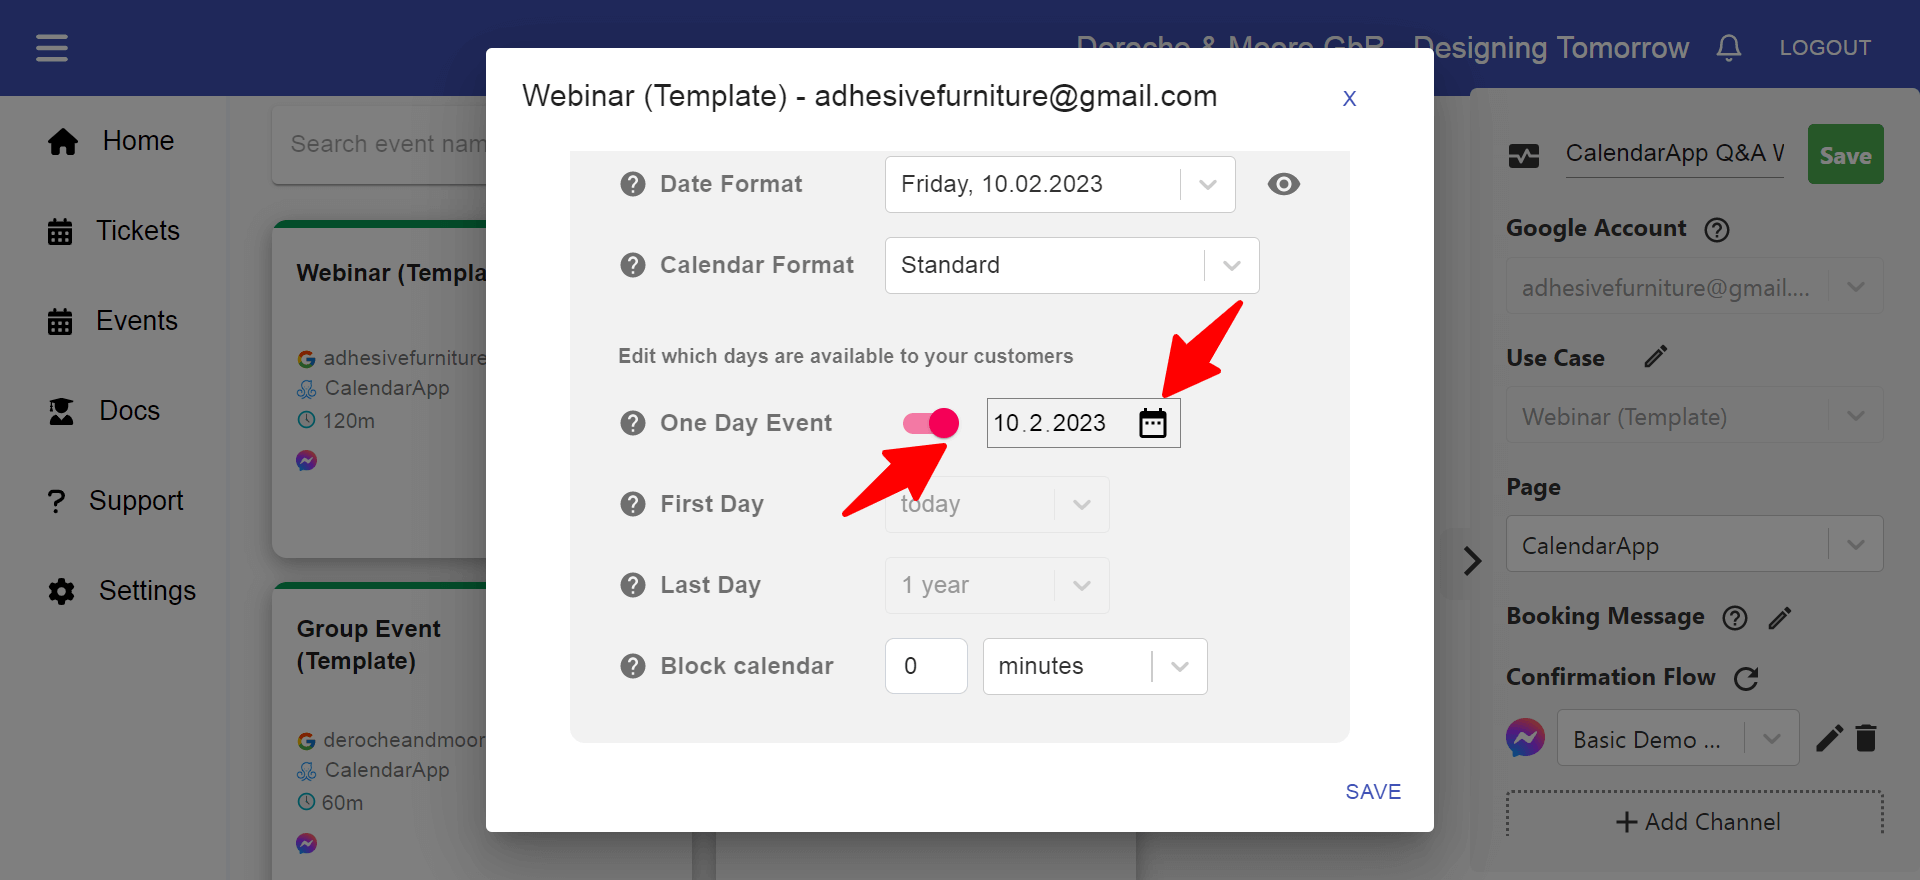
One Day Event
There might be use cases in which you want to offer a webinar on one day only and not regularly. In this case your attendees don’t need to select a date since there is only one available. Hence, the CalendarApp preselects the date presenting available time slots straight away.
To make your webinar an one day event:
- Activate the option
- Click the pencil icon & select the day
d) Scheduling Settings
Read more about scheduling settings in our article Scheduling Settings
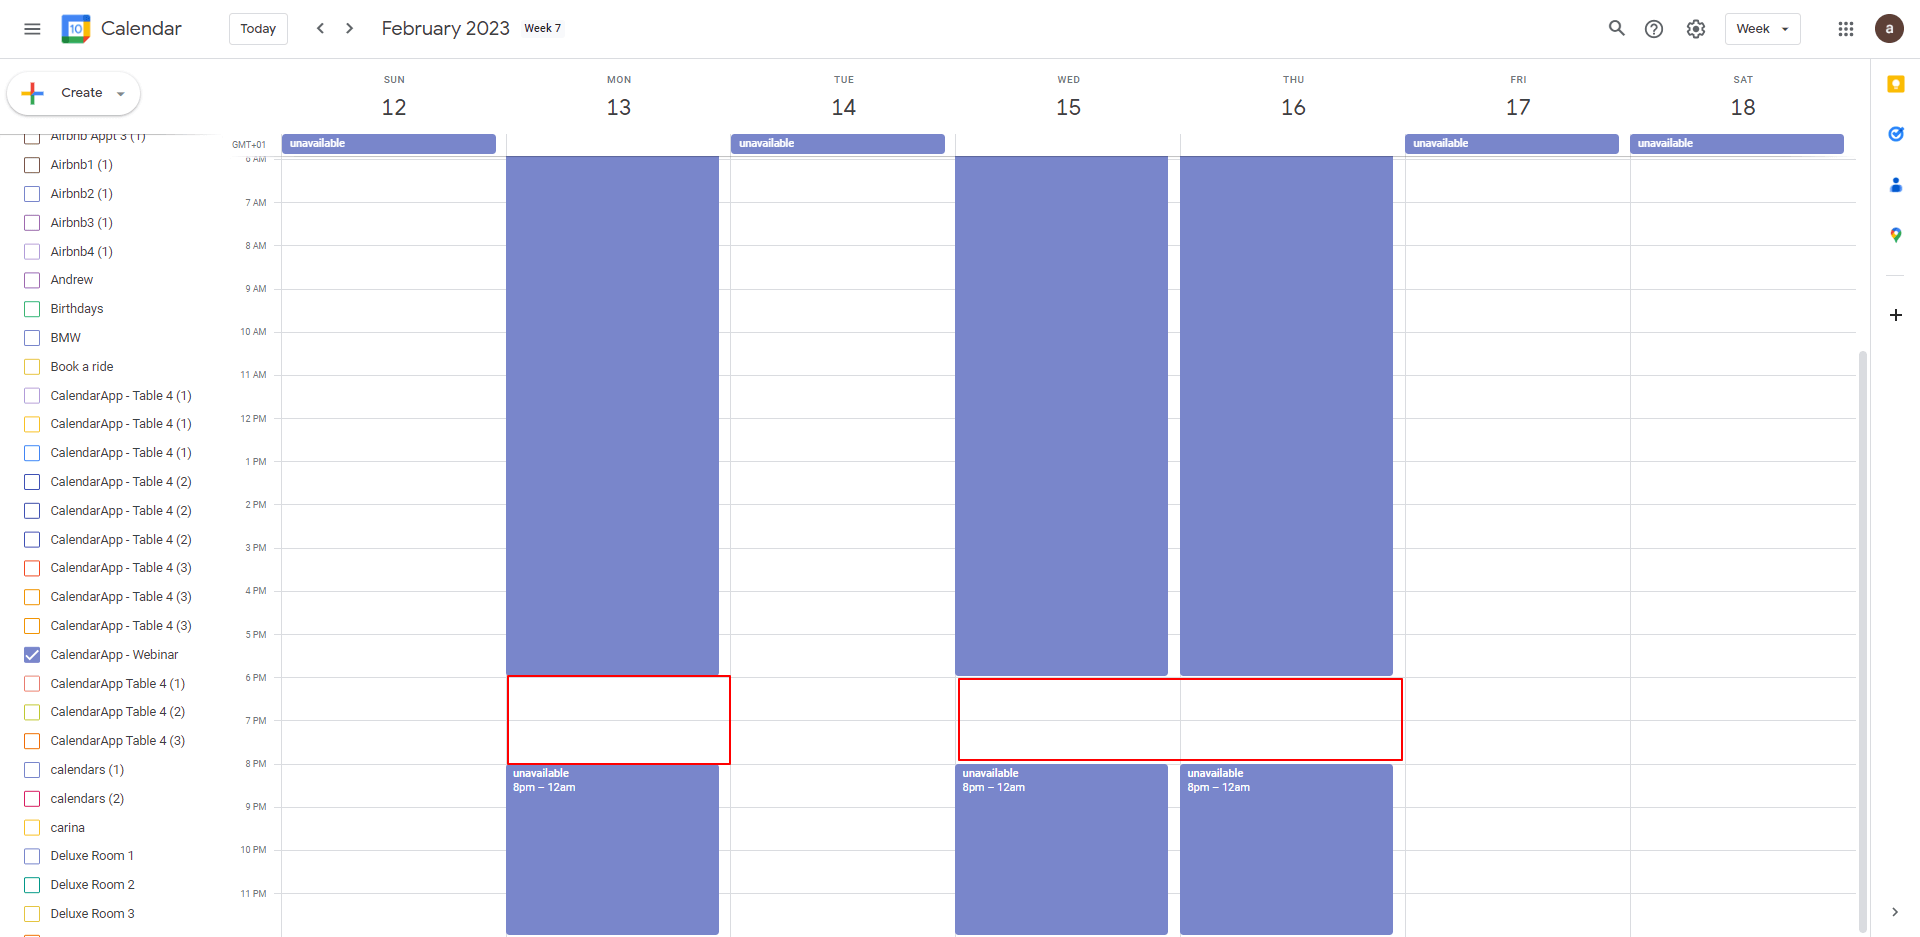
e) Opening Hours
To finish the calendar settings, we set the opening hours for your webinar. By default You webinar can be attended on
Monday, Wednesday and Thursday at 6 PM
In order to change those times edit or add recurring events to your Google Calendar.
Learn more about opening hours in our realted article
Save your settings by clicking on Save
3. Confirmation and Cancel Flow
After a user has selected date and time you want to send a confirmation. You build those confirmation flows entirely in Manychat. Every channel needs a separate confirmation flow indicated by the channel’s logo.
To increase your workflow use our free manychat template specifically designed for hosting webinars with the Google Calendar.
To select a confirmation flow for messenger click on the downfacing arrow to open the list. The list contains all flows of your (pre-)selected Manychat page.

Click on the refresh symbol if you have just added a new flow that doesn’t show up in the dropdown.
If you want to make any changes to your flow click on the pencil symbol . Your flow will open in a new tab in editing mode.

Repeat the same steps for every channel you want to use. Currently, Messenger, Instagram, Whatsapp, Telegram and Google Messages are supported.
There are a small additional settings necessary when booking appointments on Whatsapp and Telegram in mind.
For a betting understanding of the confirmation and cancel flows view the guide for confirmation flows.
4. Fields
Important scheduling data like start date or number of guests is stored in Manychat fields. If you installed the free template you will see that all fields are already set with according custom fields. So you don’t need to worry about anything.
If you want to make changes to your fields read our guide on Manychat fields.
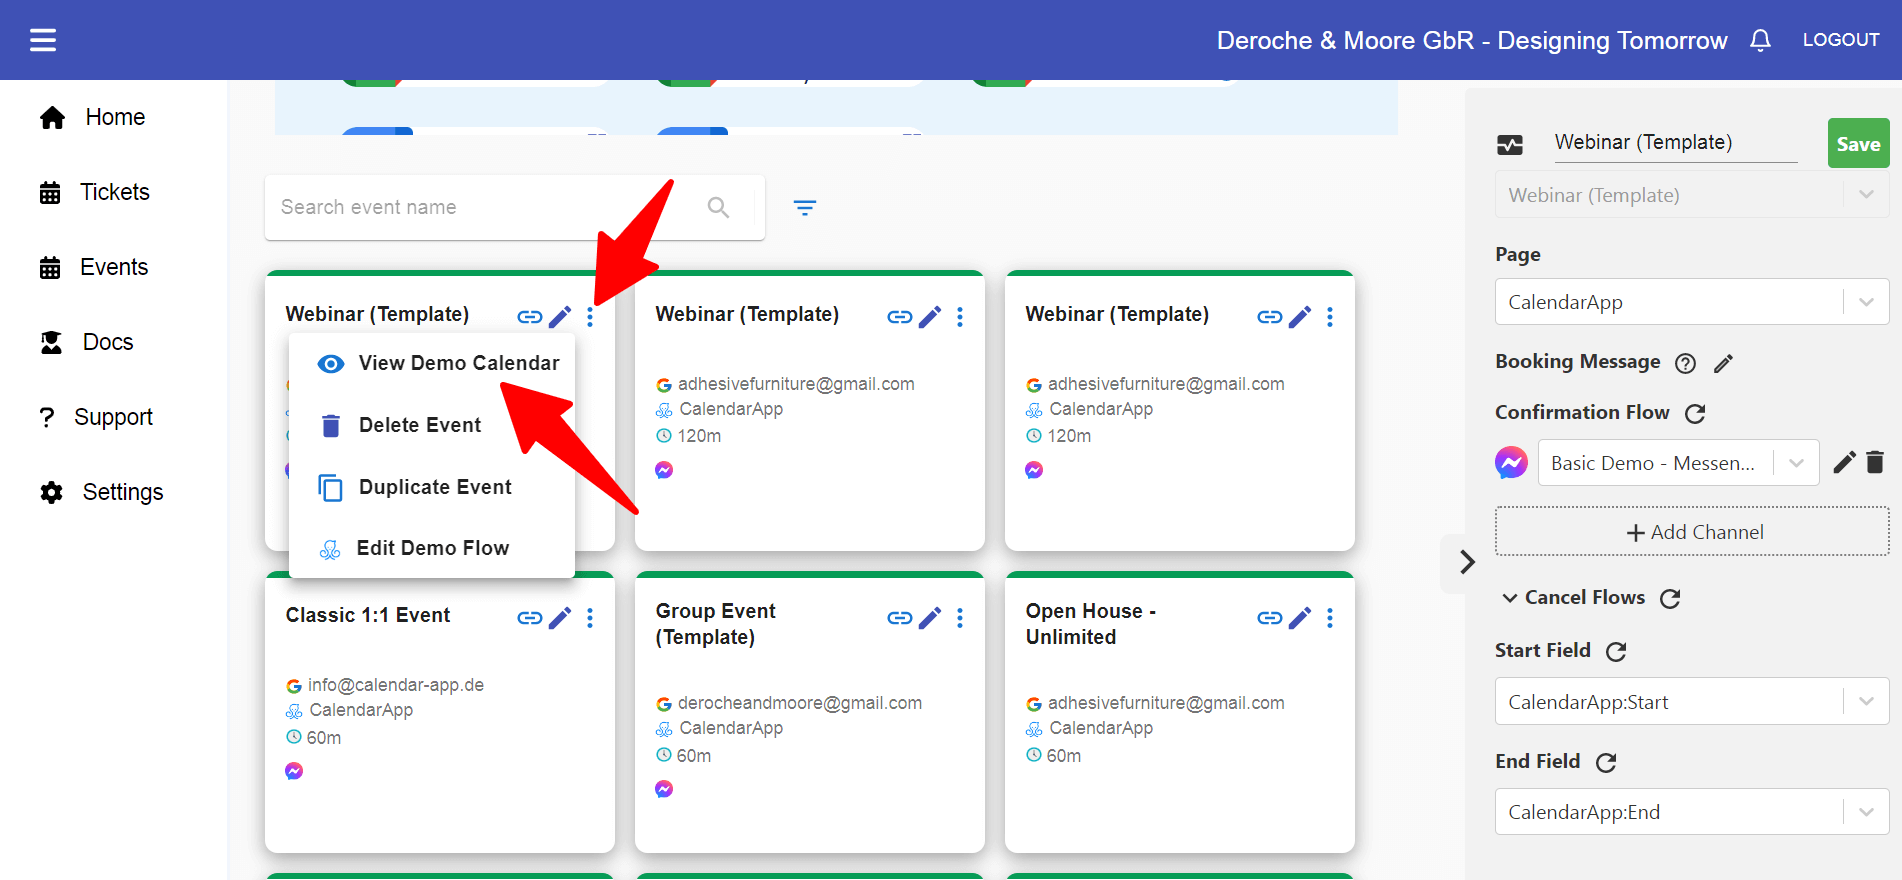
5. Edit Calendar Image & Text
To edit image and text above the calendar:
- click the vertical dots of your event card
- in the popper that opens click on View demo Calendar
Read more about editing text and image in our related blog post.
6. Start Scheduling Process
The beauty about the CalendarApp is its flexibility. You can start the scheduling process at any given point in your new or already existing funnel. Hence, you have an unlimited number of possibilities to get prospects signing up for your webinar (URLs, keywords, comments,inside a conversation).
The way you start the scheduling process stays the same though. You either a) send a message to your users containing a text and a button or b) you generate a URL that you use for an already existing button.
a) Send a message to your user
To send a message to your user you will need to select your event from the dropdown menu of the CalendarApp action inside Manychat. Make sure you select the right channel and the correct event type (schedule/reschedule).
If you installed the CalendarApp & Manychat webinar template:
- Open the flow “Keyword CalendarAppWebinar Start – Messenger” in editing mode
- Select the action block “Scheduling”
- Select the action “Import Events from Calendar-app.de/events”
- Choose your event name from the dropdown, for instance “Webinar – Schedule (Messenger)”
- Click Save
- Hit preview to view your flow and schedule your first webinar attendance
In case you have not installed the template:
- Navigate to your Manychat flow that you want to use to schedule webinars
- Insert an action block
- Select CalendarApp from the action options
- Select the first option called “Import Events from Calendar-app.de/events”
- Choose your event name from the dropdown, for instance “Webinar – Schedule (Messenger)”
- Click Save
- Make sure the action is connected to your desired existing block
- Hit preview to view your flow and schedule your first webinar attendance
a) Copy & Paste a URL to your existing button
Alternatively, instead of sending a new message to your user you can also copy your event’s URL and paste it to the button’s URL action.
- Click on the URL icon of your event image
- Select whether you want an URL for scheduling or rescheduling an event
- Copy the URL by selecting your
- channel Paste this URL to the matching field in your manychat flow
To better understand how to start the scheduling process read the related blog article
7. Add to Calendar Button
Once a prospect has scheduled their seat for your webinar you have accomplished your number one objective. Well done! However, the customer journey doesn’t stop here.
In order to make sure your customer doesn’t forget about your upcoming event they can save the appointment in their own calendar,too.
This is done by creating an add to calendar button.
We discuss the add to calendar button in more detail in the related blog post or watch the video on youtube.
8. Send Reminders
Certainly, you want to inform the prospect about the upcoming event. Sending reminders for your webinar can be done automatically using the CalendarApp and Manychat.
Our ready to be used free Manychat templates have everything you need to send automated reminders for your webinar.
Find more about sending reminders in this blog article.
9. Questions/Support?
Do you have questions or need any support?
Don’t hesitate to send us an email or submit a support ticket.